 使用React脚手架快速搭建项目
create-react-app 是来自于 FaceBook,通过该命令我们无需配置就能快速构建 React 开发环境。是基于 Webpack + ES6
# 一、基础框架搭建
npm install -g create-react-app (cnpm install -g create-react-app)
create-react-app react-demo
cd react-demo
npm start
1
2
3
4
2
3
4
现在就可以运行起来了。然而一个项目中还会涉及到页面间跳转等,这就需要使用到路由管理了。
安装 react-router-dom: npm install react-router-dom --save (ps:这里安装完后版本是 6.2.1)
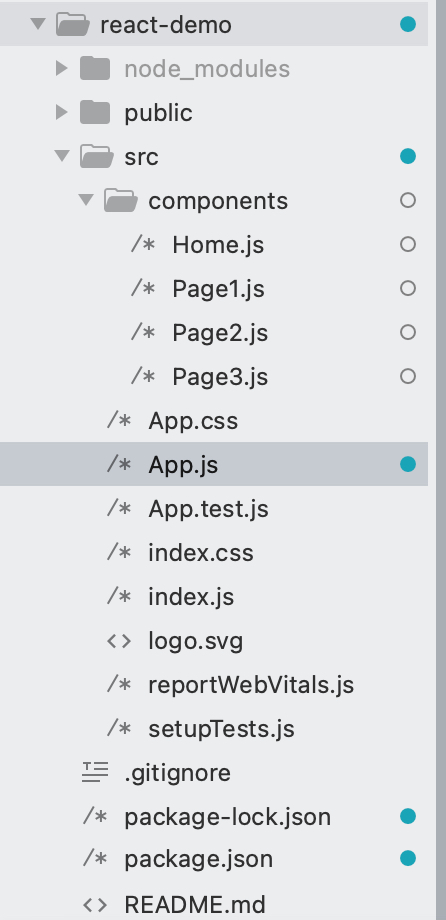
现在来更改官网例子,首先在 src 文件夹下创建 components 文件夹,然后创建 Home.js 文件、Page1.js 文件、Page2.js 文件、Page3.js 文件,此时目录就如下所示。
Home.js 文件代码如下:
import React from 'react';
import { Link, Outlet } from 'react-router-dom';

export default function Home () {
	return(
		<div>
			<div>This is Home!</div>
			<Link to="/Page1?name=tom" style={{color:'red'}}>
				<div>点击跳转到Page1</div>
			</Link>

			<Link to="/Page2" style={{color:'blue'}}>
				<div>点击跳转到Page2</div>
			</Link>

			<Link to="/Page3" style={{color:'gold'}}>
				<div>点击跳转到Page3</div>
			</Link>

			 <Outlet />

		</div>
	);
}
1
2
3
4
5
6
7
8
9
10
11
12
13
14
15
16
17
18
19
20
21
22
23
24
2
3
4
5
6
7
8
9
10
11
12
13
14
15
16
17
18
19
20
21
22
23
24
Page1.js 代码如下:
export default function Page1 () {
	return(
		<div>
			<div>This is Page1!</div>
		</div>
	);
}
1
2
3
4
5
6
7
2
3
4
5
6
7
Page2.js 与 page3.js 代码内容类似。
页面创建完了,现在来配置路由,更改 App.js 文件中内容,引入路由管理所需的组件,以及刚刚新建的几个页面。
# 二、路由配置
# ①、嵌套路由配置
import React from 'react';
import { BrowserRouter as Router, Route, Routes } from 'react-router-dom';
import Home from './components/Home';
import Page1 from './components/Page1';
import Page2 from './components/Page2';
import Page3 from './components/Page3';
import './App.css';

export default class App extends React.Component {
  render () {
    return (
      <Router>
        <Routes>
          <Route path="/" exact element={<Home/>} >
            <Route path="/Page1" element={<Page1/>} />
            <Route path="/Page2" element={<Page2/>} />
            <Route path="/Page3" element={<Page3/>} />
          </Route>
        </Routes>
      </Router>
    );
  }
}
1
2
3
4
5
6
7
8
9
10
11
12
13
14
15
16
17
18
19
20
21
22
23
2
3
4
5
6
7
8
9
10
11
12
13
14
15
16
17
18
19
20
21
22
23
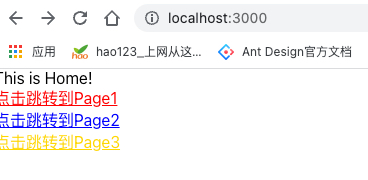
下面运行 npm start 在浏览器中就可以看到如下效果:
点击跳转到 Page1 后效果如下:

# ②、非嵌套路由配置
更改 App.js 文件中代码:
import React from 'react';
import { BrowserRouter as Router, Route, Routes } from 'react-router-dom';
import Home from './components/Home';
import Page1 from './components/Page1';
import Page2 from './components/Page2';
import Page3 from './components/Page3';
import './App.css';

export default class App extends React.Component {
  render () {
    return (
      <Router>
        <Routes>
          <Route path="/" exact element={<Home/>} />
          <Route path="/Page1" element={<Page1/>} />
          <Route path="/Page2" element={<Page2/>} />
          <Route path="/Page3" element={<Page3/>} />
        </Routes>
      </Router>
    );
  }
}
1
2
3
4
5
6
7
8
9
10
11
12
13
14
15
16
17
18
19
20
21
22
2
3
4
5
6
7
8
9
10
11
12
13
14
15
16
17
18
19
20
21
22
现在点击跳转到 Page1 后效果如下:

# 三、react router v6 与 v5 比较
- 1、在 react-router-dom v6 中 Route 组件必须使用 Routes 嵌套,替换了 v5 中的 Switch 组件。
- 2、将原来的 component 改为 element,必须以组件形式引入,而不是原来一个变量就行了。如 v6
element = {<Home/>},v5compoent = {Home} - 3、嵌套路由必须在父级中添加 Outlet 组件,作为子组件的占位符,相当于 vue-router 中的 router-view。
- 4、useNavigate 替代了 useHistory
# 四、路由相关
# 1、路由传参的三种方式
# (1)、向路由传递 Params 参数
// 传递参数
<Link to="/page1/tom" style={{color:'red'}}>
	<div>点击跳转到Page1</div>
</Link>

// 路由配置修改(React Router V6)
{
	path: "/page1/:name",
	element: <Page1 />
}

// 函数组件接收参数
import { useParams } from "react-router-dom"
const params = useParams()
console.log('获取参数', params.name)

/*
	在v5的class组件中可以直接通过this.props.match.params获取到。
	在v6的class组件中使用this.props什么也获取不到,甚至打印this发现也是什么都没有
*/

/*
	在react router v6版本类组件接收参数,需要用到v5版本那样的WithRouter组件,v5自带,v6已移除
	withRouter是一个高阶函数组件,作用就是能够让不是通过路由匹配渲染的组件身上也具备history、location等对象属性
*/
// 自定义WithRouter组件
import { useParams, useLocation } from "react-router-dom"

export default function withRouter(Component) {
  return (props) => {
    const params = useParams();
    const location = useLocation();
    return <Component {...props} params={params} location={location} />
  }
}


// 然后在需要获取参数的组件中这样使用
import React, { useEffect } from 'react';
import withRouter from '../WithRouter';

class Page1 extends React.Component {
	render() {
		// 获取params参数
		console.log('params', this.props.params)
		return (
			<div>
				page1
			</div>
		);
	}
}

export default withRouter(Page1);
1
2
3
4
5
6
7
8
9
10
11
12
13
14
15
16
17
18
19
20
21
22
23
24
25
26
27
28
29
30
31
32
33
34
35
36
37
38
39
40
41
42
43
44
45
46
47
48
49
50
51
52
53
54
2
3
4
5
6
7
8
9
10
11
12
13
14
15
16
17
18
19
20
21
22
23
24
25
26
27
28
29
30
31
32
33
34
35
36
37
38
39
40
41
42
43
44
45
46
47
48
49
50
51
52
53
54
# (2)、向路由传递 Search 参数:
// 传递参数
<Link to="/page1?name=tom&age=20" style={{color:'red'}}>
	<div>点击跳转到Page1</div>
</Link>

// 函数组件(function组件)接收参数
import { useSearchParams  } from "react-router-dom";
const [searchParams, setSearchParams] = useSearchParams();
console.log('searchParams', searchParams.get("name"))
// setSearchParams("name=jack&age=30")  // 用于更新search参数

/*
	在v5类组件(class组件)接收参数可以直接通过this.props.location.search接收
*/
const params = this.props.location.search
console.log("参数", params) // 结果类似这样,"?name=tom&age=20"

/*
	在v6类组件中接收参数需要用到WithRouter组件,否则this.props.location什么也获取不到
*/
import React, { useEffect } from 'react';
import withRouter from '../WithRouter';

class Page1 extends React.Component {
	render() {
		// 获取Search参数
		console.log('params', this.props.location.search) // "?name=tom&age=20"
		return (
			<div>
				page1
			</div>
		);
	}
}

export default withRouter(Page1);
1
2
3
4
5
6
7
8
9
10
11
12
13
14
15
16
17
18
19
20
21
22
23
24
25
26
27
28
29
30
31
32
33
34
35
36
2
3
4
5
6
7
8
9
10
11
12
13
14
15
16
17
18
19
20
21
22
23
24
25
26
27
28
29
30
31
32
33
34
35
36
# (3)、向路由传递 state 参数:
// 在react router v5中这样传递
<Link to={{ pathname: "/page1", state: {name: 'tom', age: 28} }} style={{color:'red'}}>
	<div>点击跳转到Page1</div>
</Link>

{/* 在react router v6中需要这样传递 */}
<Link to="/page1" state={{name: 'tom', age: 28}} style={{color:'red'}}>
	<div>点击跳转到Page1</div>
</Link>

{ /* 在react router v5,类组件中可直接获取state */ }
console.log("state", this.props.location.state)  //

// 在react router v6中需要使用WithRouter组件将需要获取state的组件包裹起来才能获取到
import React, { useEffect } from 'react';
import withRouter from '../WithRouter';

class Page1 extends React.Component {
	render() {
		// 获取state参数
		console.log('params', this.props.location.state)
		return (
			<div>
				page1
			</div>
		);
	}
}

export default withRouter(Page1);


// 在react router v6函数组件中获取state
import { useLocation } from "react-router-dom";

export default function Page1 () {
	const location = useLocation()
	console.log("state", location.state)
	return(
		<div>
			<div>Page1!</div>
		</div>
	);
}
1
2
3
4
5
6
7
8
9
10
11
12
13
14
15
16
17
18
19
20
21
22
23
24
25
26
27
28
29
30
31
32
33
34
35
36
37
38
39
40
41
42
43
44
2
3
4
5
6
7
8
9
10
11
12
13
14
15
16
17
18
19
20
21
22
23
24
25
26
27
28
29
30
31
32
33
34
35
36
37
38
39
40
41
42
43
44
# 2、路由跳转的方法
# (1)、编程式路由导航跳转
// react router v5 history方法跳转
// push跳转
this.props.history.push('/page3');

// push跳转携带params参数
this.props.history.push(`/page3/tom/28`)

// push跳转携带search参数
this.props.history.push(`/page3?name=tom&age=28`)

// push跳转携带state参数
this.props.history.push('/page3', {name: 'tom', age: 28})

// replace跳转,携带参数同push跳转
this.props.history.replace('/page3')


// react router v6 跳转
import { useNavigate } from 'react-router-dom'

const navigate = useNavigate()
// 携带search参数
navigate("/page1?name=tom&age=28")

// 携带state参数
navigate("/page1", {state: {name: 'tom', age: 28}})

// 携带params参数时,需要在路由配置里进行动态路由配置
navigate('/page1/tom/28')

// 前进一步
navigate(1)

// 后退一步
navigate(-1)
1
2
3
4
5
6
7
8
9
10
11
12
13
14
15
16
17
18
19
20
21
22
23
24
25
26
27
28
29
30
31
32
33
34
35
36
2
3
4
5
6
7
8
9
10
11
12
13
14
15
16
17
18
19
20
21
22
23
24
25
26
27
28
29
30
31
32
33
34
35
36
# (2)、通过 Link 组件或 NavLink 组件跳转
// 默认是push跳转,可通过replace属性开始replace模式跳转,可携带params参数、search参数、replace参数
<Link to="/page1" style={{color:'red'}}>
	<div>点击跳转到Page1</div>
</Link>
1
2
3
4
2
3
4
# 3、通过配置文件实现路由管理(useRoutes)
在 src 目录下新建 routes 文件夹,在该文件夹下新建 routes.js 文件,代码如下:
import React from 'react';
import Home from '../components/Home';
import Page1 from '../components/Page1';
import Page2 from '../components/Page2';
import Page3 from '../components/Page3';

const routes = [
	{
		path: "/",
		element: <Home />,
		children: [
			{
				path: "page1",
				element: <Page1 />
			},
			{
				path: "page2",
				element: <Page2 />
			},
			{
				path: "page3",
				element: <Page3 />
			}
		]
	}
]

export default routes
1
2
3
4
5
6
7
8
9
10
11
12
13
14
15
16
17
18
19
20
21
22
23
24
25
26
27
28
2
3
4
5
6
7
8
9
10
11
12
13
14
15
16
17
18
19
20
21
22
23
24
25
26
27
28
更改 App.js 文件代码:
import React from 'react';
import { BrowserRouter as Router, useRoutes } from 'react-router-dom';
import routes from './routes/routes.js'
import './App.css';

export default function App () {
  const GetRoutes = () => {
    const route = useRoutes(routes)
    return route
  }
  return (
    <Router>
      <GetRoutes />
    </Router>
  )
}
1
2
3
4
5
6
7
8
9
10
11
12
13
14
15
16
2
3
4
5
6
7
8
9
10
11
12
13
14
15
16
ps:useRoutes 的整个组件都必须放入 Router 组件当中
编辑 (opens new window)
上次更新: 7/1/2024, 4:56:33 PM